inoLED micro – ESP32-C3 Addressable RGB LED Driver (5–24V)
inoLED micro
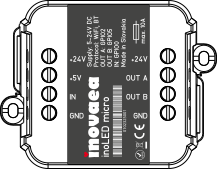
ESP32-C3 Addressable RGB LED Controller
Compact and powerful LED driver for addressable RGB strips and matrices. Supports chipsets like WS2812B, SK6812, WS2815 and APA102. Flash with WLED, ESPHome or custom firmware over USB-C. Integrates natively with Home Assistant.
Overview
inoLED micro is built around the ESP32-C3 microcontroller and optimized for:
- Addressable LED strips and matrices
- Interactive and music-reactive LED installations
- Home automation lighting (WLED, ESPHome, MQTT)
- Architectural and ambient lighting
- IoT-connected lighting systems
It provides:
- High-current LED output (10A fused)
- Wide input voltage range (5–24V DC)
- ESD protection on all I/O lines
- Integrated stabilization capacitor (1000µF)
- USB-C programming interface
- Dedicated boot and reset buttons
The board supports both:
- Single-wire timing protocols (WS2812 type)
- SPI-based LEDs (APA102, WS2801, etc.)
Specifications
| Parameter | Value |
|---|---|
| Controller | ESP32-C3 |
| Input voltage | 5–24V DC |
| Max current | 10A (fused) |
| Programming | USB-C |
| Capacitor | 1000µF built-in |
| ESD protection | Yes (all I/O) |
| Protection class | IP20 |
| Operating temperature | -15°C to +45°C |
GPIO Mapping
| Function | GPIO |
|---|---|
| RESET button | GPIO_EN |
| FLASH button | GPIO_9 |
| LED DATA (OUT A) | GPIO_2 |
| LED CLK (OUT B) | GPIO_5 |
| Button / Switch input | GPIO_0 |
Supported LED Chipsets
| Chipset | Protocol | Voltage | Notes |
|---|---|---|---|
| WS2812B | Single-wire | 5V | Most popular, RGB |
| WS2811 | Single-wire | 5–12V | External driver chip |
| WS2813 | Single-wire | 5V | Dual data line (backup) |
| WS2815 | Single-wire | 12V | 12V, backup data line |
| SK6812 | Single-wire | 5V | RGBW support |
| TM1814 | Single-wire | 12V | RGBW, 12V |
| APA102 | SPI | 5V | High refresh, precise timing |
| WS2801 | SPI | 5V | Legacy SPI chipset |
| LDP8806 | SPI | 5V | 7-bit PWM per channel |
| GS8208 | Single-wire | 12V | 12V RGB |
Power & Consumption
Power Supply Requirements
| Strip type | Voltage | Typical current (full white) |
|---|---|---|
| WS2812B 60 LED/m | 5V | ~3.6 A/m |
| WS2812B 144 LED/m | 5V | ~8.6 A/m |
| WS2815 60 LED/m | 12V | ~1.5 A/m |
| SK6812 RGBW 60 LED/m | 5V | ~4.8 A/m |
Built-in Protection
- 10A polyfuse – protects against overcurrent
- 1000µF electrolytic capacitor – absorbs inrush current on power-up
- ESD protection on all data and control lines
Recommendations for Large Installations
- Inject power at both ends of the strip for runs longer than 2m
- Use 16–18 AWG wire for power distribution
- Use a dedicated PSU rated at 125% of calculated load
- Keep the data wire short between board and first LED
Install WLED
WLED is the recommended firmware for inoLED micro. It provides over 100 built-in effects, a web UI, real-time control and deep Home Assistant integration — all without writing a single line of code.
Flash via Browser (Recommended)
- Disconnect external power supply
- Connect inoLED micro via USB-C
- Open install.wled.me in Chrome or Edge
- Select the latest WLED version → click Install
- Select the COM port → Connect → Install WLED → confirm
- Wait ~30 seconds for flashing to complete
- Disconnect USB, connect external power
Hold RESET + FLASH for 3 seconds → release RESET → release FLASH after 1 second. Device enters bootloader mode and the COM port will appear.
First-Time Wi-Fi Setup
After flashing, inoLED micro broadcasts a hotspot named WLED-AP (password: wled1234).
- Connect your phone or laptop to
WLED-AP - Open
4.3.2.1in browser → WLED setup UI loads - Enter your home Wi-Fi SSID and password
- Set LED type, GPIO pin (default: GPIO 2), and LED count
- Save and reboot – device joins your network
WLED GPIO Configuration
| Setting | Value |
|---|---|
| Data pin | GPIO 2 (OUT A) |
| Clock pin (SPI only) | GPIO 5 (OUT B) |
| Button pin | GPIO 0 |
| Max current limit | Match your PSU (e.g. 5000 mA) |
Notable WLED Effects
| Effect | Description |
|---|---|
| Solid | Static color fill |
| Breathe | Smooth brightness pulse |
| Rainbow | Full spectrum color rotation |
| Fire 2012 | Realistic flame simulation |
| Sinelon | Bouncing dot with fading trail |
| Twinkle | Random pixel sparkle |
| Noise | Organic Perlin noise patterns |
| Theater Chase | Marching pixel segments |
| Ripple | Expanding concentric rings |
| Reactive | Audio-reactive (with mic add-on) |
ESPHome
ESPHome gives you full control with YAML-defined automations and direct Home Assistant entity integration — no cloud, no WLED required.
Minimal Configuration
esphome:
  name: inoled-micro
  friendly_name: inoLED micro

esp32:
  board: esp32-c3-devkitm-1
  framework:
    type: arduino

wifi:
  ssid: !secret wifi_ssid
  password: !secret wifi_password
  ap:
    ssid: "inoLED Fallback"
    password: "12345678"

logger:
api:
ota:

light:
  - platform: neopixelbus
    type: GRB
    variant: WS2812
    pin: GPIO2
    num_leds: 60
    name: "inoLED Strip"
    id: led_strip
    effects:
      - pulse:
          name: "Slow Pulse"
          transition_length: 2s
          update_interval: 2s
      - random:
          name: "Random Colors"
      - addressable_rainbow:
          name: "Rainbow"
          speed: 10
          width: 50
      - addressable_fireworks:
          name: "Fireworks"
          use_random_color: true
SPI Strip (APA102 / WS2801)
light:
  - platform: neopixelbus
    type: BGR
    variant: APA102
    data_pin: GPIO2
    clock_pin: GPIO5
    num_leds: 60
    name: "inoLED APA102"
Button Automation
binary_sensor:
  - platform: gpio
    pin:
      number: GPIO0
      mode: INPUT_PULLUP
      inverted: true
    name: "inoLED Button"
    on_press:
      then:
        - light.toggle: led_strip
ESPHome entities are auto-discovered in Home Assistant when both devices are on the same network and the ESPHome integration is installed.
Home Assistant
inoLED micro integrates with Home Assistant in three ways:
- ✓Auto-discovered via mDNS
- ✓Full light entity with effects
- ✓Segment & palette control
- ✓Real-time sync
- ✓Native HA light entity
- ✓YAML automations
- ✓Button / sensor support
- ✓OTA firmware updates
- ✓Works with any MQTT broker
- ✓JSON payload control
- ✓Raw topic publish/subscribe
- ✓Fully scriptable
Option 1 – WLED Integration (Recommended)
After flashing WLED and connecting to Wi-Fi:
- Go to Settings → Devices & Services → Add Integration
- Search for WLED — your device will be auto-discovered
- A light entity appears with full effect, brightness, color and segment control
Example automation:
automation:
  - alias: "LED strip – sunset scene"
    trigger:
      - platform: sun
        event: sunset
    action:
      - service: light.turn_on
        target:
          entity_id: light.inoled_micro
        data:
          brightness_pct: 60
          color_temp: 3000
          effect: "Breathe"
Option 2 – ESPHome
After flashing ESPHome firmware and installing the ESPHome add-on:
- inoLED micro is auto-discovered as a new HA device
- Click Configure to add the light entity
- Use the light in automations, dashboards and scenes
The entity supports on/off, brightness, RGB color, custom effects, and button input as a binary sensor — all manageable from the HA UI or YAML.
Option 3 – MQTT
Configure MQTT in WLED under Config → Sync Interfaces → MQTT:
| Setting | Example |
|---|---|
| MQTT broker | 192.168.1.10 |
| Port | 1883 |
| Topic | wled/inoled |
Control topics:
# Turn on at brightness 200
wled/inoled/api  →  {"on":true,"bri":200}

# Set RGB color
wled/inoled/api  →  {"seg":[{"col":[[255,100,0]]}]}

# Set effect by ID
wled/inoled/api  →  {"seg":[{"fx":66}]}

# Read current state
wled/inoled       ← publishes JSON state on every change
configuration.yaml light definition:
mqtt:
  light:
    - name: "inoLED micro"
      command_topic: "wled/inoled/api"
      state_topic: "wled/inoled"
      schema: json
      brightness: true
      rgb: true
      effect: true
      effect_list:
        - "Solid"
        - "Breathe"
        - "Rainbow"
        - "Fire 2012"
        - "Twinkle"
        - "Sinelon"
Comparison
| Parameter | inoLED micro | QuinLED-Dig-Uno | WLED Wemos Shield | Athom LED Controller |
|---|---|---|---|---|
| MCU | ESP32-C3 | ESP32 | ESP8266 | ESP8266 |
| Input voltage | 5–24V | 5–24V | 5V only | 5–12V |
| Max current | 10A (fused) | 10A | 3A | 5A |
| SPI support | Yes | Yes | Yes | No |
| USB-C | Yes | Micro-USB | Micro-USB | No USB |
| ESD protection | Yes | Partial | No | No |
| Built-in capacitor | 1000µF | Yes | No | No |
| WLED ready | Yes | Yes | Yes | Yes |
| ESPHome | Yes | Yes | Limited | Limited |
| Home Assistant | Native | Native | Native | Native |
| Button input | GPIO0 | Yes | No | No |
| Form factor | Compact PCB | Medium PCB | Wemos Shield | Enclosure |
Use Cases
- →Under-cabinet RGB accent strips
- →Ambient TV bias lighting
- →Staircase lighting with motion trigger
- →Sunrise alarm wake-up effects
- →Music-synced LED walls
- →Beat-reactive light effects
- →DJ / stage lighting rigs
- →Bar and lounge ambience
- →Cove and cornice lighting
- →Facade and exterior accents
- →Shop window display lighting
- →Exhibition installations
- →LED matrix and panel displays
- →Cosplay and wearable projects
- →3D printer enclosure lighting
- →Notification / status indicators
Downloads
- Datasheet PDF (coming soon)
- 3D model STEP file (coming soon)
- Pinout diagram
- ESPHome YAML template
- WLED presets export